| 일 | 월 | 화 | 수 | 목 | 금 | 토 |
|---|---|---|---|---|---|---|
| 1 | 2 | 3 | 4 | 5 | 6 | 7 |
| 8 | 9 | 10 | 11 | 12 | 13 | 14 |
| 15 | 16 | 17 | 18 | 19 | 20 | 21 |
| 22 | 23 | 24 | 25 | 26 | 27 | 28 |
- ㅁㅇㅂ??ㅇㅈㄷ ㅎㅇㅌ...
- 인턴 후기
- Forensic 절차
- 소프트웨어 개발보안 경진대회
- PyAmdecoder
- 방명록 만들기
- 메모리 포랜식
- 3단계 지역 DB
- Database
- spring
- JSTL
- react
- reversing.kr
- riceteacatpanda
- frontend
- 동읍면 DB
- restapi
- SessionAttribute
- 네이버 인턴
- jsp
- 행정지역 DB
- webhacking 처음
- DBMS
- Layered Architecture
- 인턴 지원
- 소개딩
- EER
- 정보보호병 후기
- Django
- mysql
- Today
- Total
웹찢남
REACT 7일차 (스토리 북) 본문
비주얼 테스트란 화면을 구성하는 컴포넌트들을 독립적으로 관리하고
변화를 살펴볼 수 있는 방법을 의미한다.
스토리북 설치하고 사용해 보기
1.스토리북 설치하기
yarn add --dev @storybook/react
2.package.json에 스토리북 실행 명령어 추가하기
"scripts"중괄호에 아래와 같은 line입력
"storybook": "start-storybook -p 9001 -c .storybook",
-> storybook 명령어가 스토리북 서버를 9001 포트를 통해 실행
3.스토리 파일 만들기
스토리는 컴포넌트의 여러 출력 형태를 구성한 페이지다.
스토리 파일은 아래와 같이 만들 수 있다.
import React, { Component } from "react";
import { storiesOf } from "@storybook/react";
=> 스토리를 스토리북 도구에 추가해주는 함수 임포트
import Input from "../03/Input.jsx";
=> Input 컴포넌트 임포트
storiesOf('Input',module).add('기본 설정',() => <Input />);
=> 스토리북 도구에 표시할 스토리의 이름,메뉴 이름 입력
4.스토리북 config.js에 스토리 연결하기
스토리를 스토리북 config.js에 연결
=> 프로젝트 루트 폴어데 .storybook이라는 폴더 생성후 config.js파일 생성
import { configure } from '@storybook/react';
function loadStories() {
require('../src/stories/InputStory'); => InputStory를 스토리북에 연결
//스토리 파일 추가
}
configure(loadStories,module);
5.스토리 북 실행하기
yarn storybook

6.스토리북 오류 메시지 출력하기
해당 페이지의 콘솔 창을보면 Input 컴포넌트의 필수 프로퍼티인 name이 없다는 오류가 발생한다.
Input 스토리에서 add()함수로 추가한 컴포넌트에 name 프로퍼티를 추가하면 된다.
storiesOf("Input", module).add("기본 설정", () => <Input name="name" />);
-------------------------------------------------------------
스토리북 사용 2
1.스토리에 다른 형태의 컴포넌트 추가하기
라벨이 있는 형태의 Input 컴포넌트를 스토리에 추가하자
storiesOf("Input", module)
.add("기본 설정", () => <Input name="name" />)
.add("label 예제", () => <Input name="name" label="이름: " />);
2. 스토리 추가하기
전에 만들었던 jsx파일을 추가 할 수도 있다.
import React, { Component } from "react";
import { storiesOf } from "@storybook/react";
import Count from "../03/Count"; => 전에만들었던 count 증가 버튼
storiesOf("Count", module).add("기본 설정", () => <Count count={0} />);
(NewCounterStory.jsx 생성)
3. 스토리북에 스토리 추가
config.js 라인 추가
require("../src/stories/NewCounterStory");

4. 스토리가 자동으로 스토리북에 추가되도록 config.js 설정
아래와 같은 코드로 수정하면 stories에 있는 파일 이름을 검사하여 자동으로 추가
import { configure } from "@storybook/react";
import interopRequireDefault from "babel-runtime/helpers/interopRequireDefault";
function loadStories() {
const context = require.context("../src/stories", true, /Story\.jsx$/);
context.keys().forEach((srcFile) => {
interopRequireDefault(context(srcFile));
});
}
configure(loadStories, module);
------------------------------------------------------------------------
스토리북 확장 도구 사용하기
1. addon-actions 설치하기( 스토리북에서 발생하는 특정 이벤트에 로그 출력 )
yarn add --dev @storybook/addons @storybook/addon-actions
2. addon-actions 설정 추가하기( 확장도구를 스토리 북이 인식할 수 있도록 설정 )
.storybook폴더에 addons.js 파일을 만들고 입력 후 저장
import '@storybook.addon-actions/register';
3. InputStory 스토리에 addon-actions 적용하기
import React, { Component } from "react";
import { storiesOf } from "@storybook/react";
import { action } from "@storybook/addon-actions";
import Input from "../03/Input.jsx";
storiesOf("Input", module)
.add("기본 설정", () => <Input name="name" />)
.add("label 예제", () => <Input name="name" label="이름: " />)
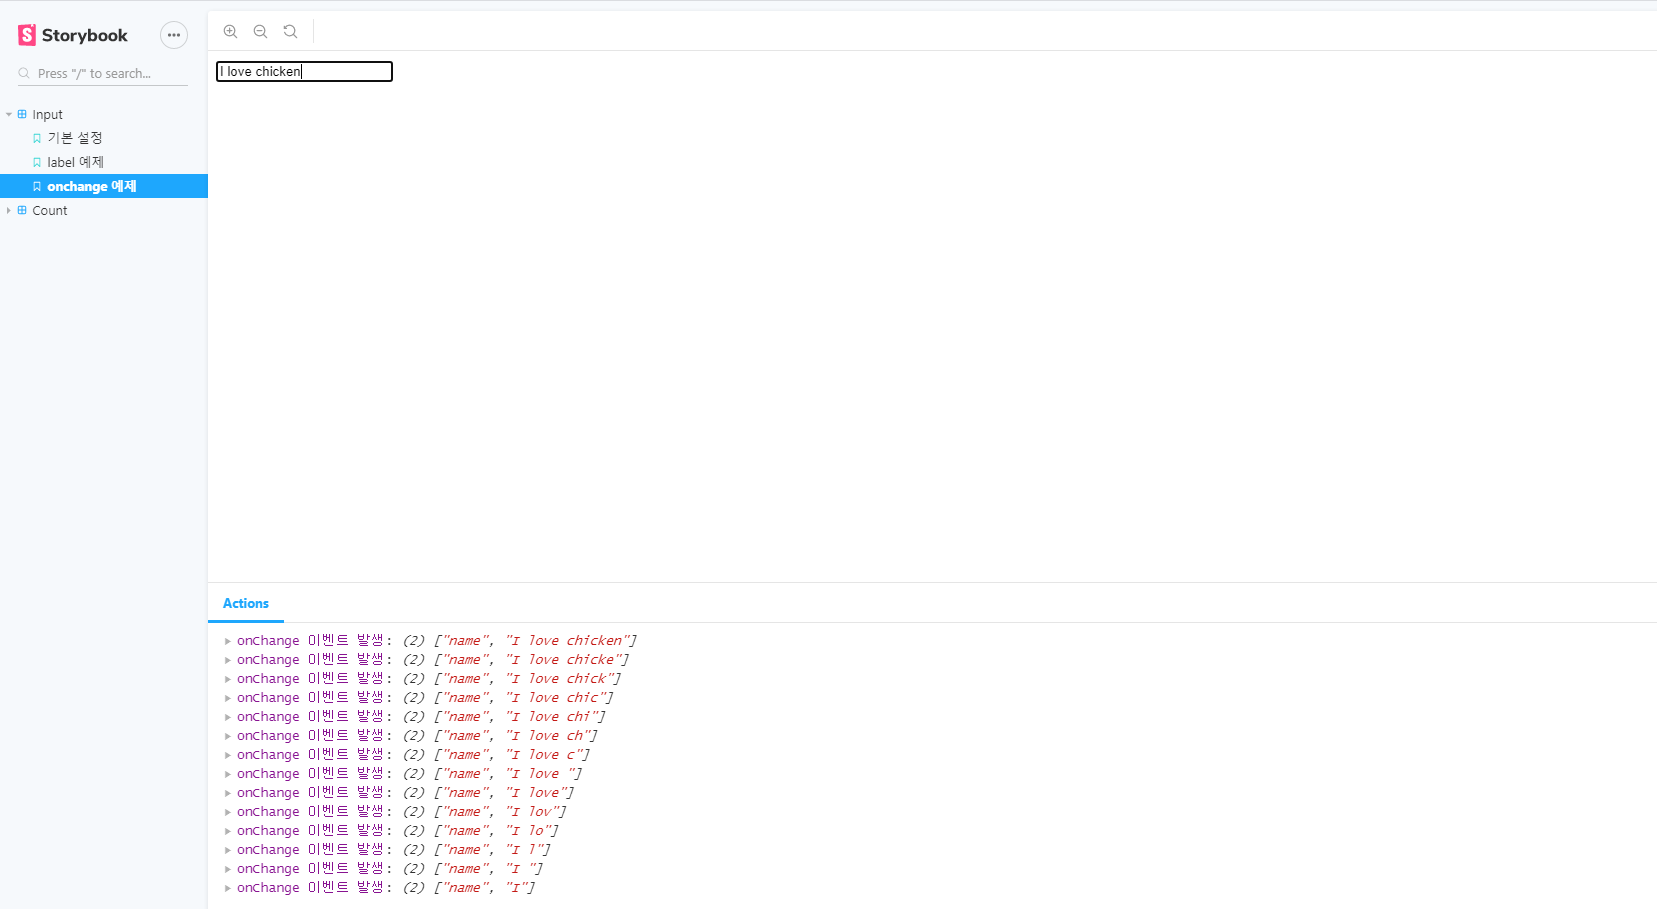
.add("onchange 예제", () => <Input name="name" onChange={action("onChange 이벤트 발생")} />);
위와 같이 addon-actions를 적용하면 변경이벤트가 발생하면 onChange프로퍼티에 전달한 콜백 함수를 실행한다.

4. addon-jsx 설치하기 => 스토리 북에서 JSX코드를 확인할 수 있도록 해줌
yarn add --dev storybook-addon-jsx
5. addon-jsx 설정 추가 (addons.js)
import "storybook-addon-jsx/register";
6. addWithJSX를 stoyOf()함수에 추가하므로 config.js도 수정해야함
아래와 같은 코드로 수정했을 경우 JSX 탭이 생긴다.
import { configure, setAddon } from "@storybook/react";
import interopRequireDefault from "babel-runtime/helpers/interopRequireDefault";
import JSXAddon from "storybook-addon-jsx";
function loadStories() {
const context = require.context("../src/stories", true, /Story\.jsx$/);
context.keys().forEach((srcFile) => {
interopRequireDefault(context(srcFile));
});
}
setAddon(JSXAddon);
configure(loadStories, module);
7.addon-jsx를 통해 JSX를 보려면 add()함수가 아닌 addWithJSX() 함수를 사용하여
스토리에 컴포넌트를 추가해야 한다.
InputStory.jsx의 add()함수를 addWithJSX()함수로 교체하면 아래와 같은 결과를 얻을 수 있다.

'FRONT_END > REACT 공부' 카테고리의 다른 글
| REACT 9일차 (Style component) (0) | 2020.07.07 |
|---|---|
| REACT 8일차 (material design) (0) | 2020.05.23 |
| REACT 6일차 (리액트 컴포넌트-3) (0) | 2020.05.20 |
| REACT 5일차 (리액트 컴포넌트-2) (0) | 2020.05.19 |
| REACT 4일차 (리액트 컴포넌트-1) (0) | 2020.05.18 |


